ALICE Portal Employees Tab
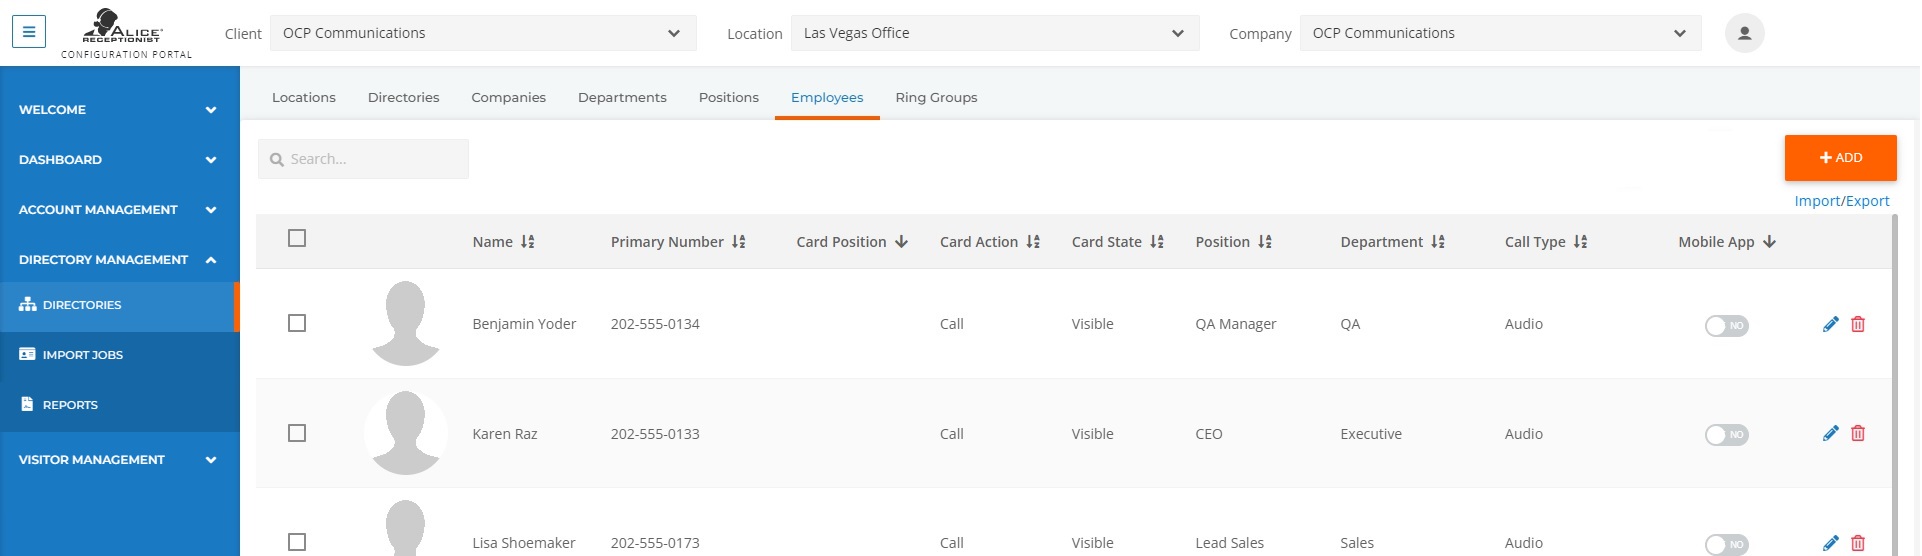
The Employees tab includes options to create, modify, import, or delete Employee listings. Employee cards directly represent employees in the ALICE Receptionist system. Verify that the correct Company is selected in the drop-down box at the top of the page before adding a new Employee listing or if an existing Employee listing doesn’t appear.
Employees can be added individually using the ALICE interface or as a group using a CSV or Azure AD Import. Learn more in the CSV File Employee Import Process and Azure AD Employee Import Process sections.
Related Videos
Creating a New Employee
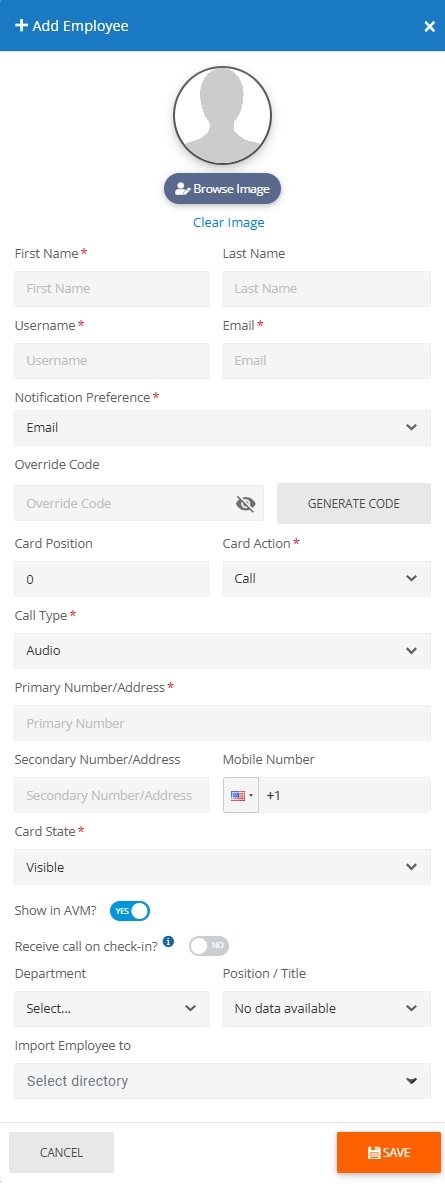
To add and create a new Employee, select the orange Add button in the top right corner of the screen.
-
Use the Browse Image button to upload the employee’s photo that will appear on the Employee card.
Note: The image size should be 500x500. Other sizes may appear distorted.
-
First Name – The employee’s first name as it will appear on the Employee card.
-
Last Name – The employee’s last name as it will appear on the Employee card.
-
Username – The employee’s username for data-keeping purposes.
-
Email – The employee’s email address which will be used to notify them of visitor check-in / outs and setting up appointments.
-
Notification Preference – How the employee will be notified when a visitor checks in. There are multiple options to choose from.
- SMS Primary Extension – A text message will be sent to the user’s primary phone number.
Note: The associated phone must support SMS receive the notification.
-
SMS Secondary Extension – A text message will be sent to the user’s secondary phone number.
Note: The associated phone must support SMS receive the notification.
-
SMS Alt Extension – A text message will be sent to the user’s alt phone number.
Note: The associated phone must support SMS receive the notification.
-
Email – The employee will be notified via email when their visitor checks in or out.
-
Slack – The employee will be notified via Slack when their visitor checks in or out.
Note: The employee’s email must match their email in Slack.
-
Teams Channel – A Teams group will be notified of visitors who check in with this employee.
-
Teams User – The employee will be notified via Teams message when their visitor checks in or out.
-
No Notification – The employee will not be notified when their visitor checks in or out.
- SMS Primary Extension – A text message will be sent to the user’s primary phone number.
-
Override Code – If an visitor is flagged as a security concern, this override code will allow the employee to check them in. Selecting the Generate Codebutton will create the code.
-
Card Position – Assigns an order to the cards that appear on the ARD. Cards with a lower position number will appear earlier on the list. For cards that share the same position number, they will be displayed alphabetically. Any card without a position will appear alphabetically after all the cards with an assigned position number.
-
Card Action – Card actions determine what happens when a visitor selects the card on the system.
-
None – The card will do nothing when selected.
-
Call – Calls the number in the “Contact Number / Address” field when this option is selected.
-
Call Type – This selection determines the type of call the employee will receive when their card is selected.
-
Audio – Connects the visitor and employee using a standard phone call to a desk or cellphone. This field typically should include the employee’s full DID phone number. If your team has directly integrated ALICE Receptionist into your SIP-enabled phone system, the employee’s extension number should be used.
-
Video – Connects the visitor and employee through a video call utilizing the ARC
 The ALICE-specific softphone client installed on the employee's PC, also known as the ALICE Receptionist Client. or a 3rd party SIP softphone client. This field should typically be in a SIP format, including the extension and server URL / IP. (Ex.:sip:###@na.sip02.alicereceptionist.com)
Note: The employee can enable or disable video using the ARC. Those employees who want to use the ARC for audio but only have one-way video should disable their video in the client. -
Teams Audio Call – Connects the visitor at the ALICE Kiosk to an employee's Microsoft Teams client using an audio-only call.
-
Teams Video Call – Connects the visitor at the ALICE Kiosk to an employee's Microsoft Teams client using a video call.
-
One-way Video Call – This is a specialized setting used for employees who would like to utilize the video features of the ARC to view the visitor but cannot use audio devices on their computers for calls. Instead, they will receive a phone call on their desk or mobile phone. When this setting is enabled, the employee must answer BOTH the ARC device and softphone to accept the call.
-
Split Call – This specialized setting is used for employees who would like to utilize the video features of the ALICE Receptionist Client to connect to the visitor via two-way video but cannot use audio devices on their computer for calls. Instead, they will receive a phone call on their desk or mobile phone. When this setting is enabled, the employee must answer BOTH the ALICE Client softphone and their phone to accept the call.
-
-
Executable – The card will launch an executable in the ARD’s content space when selected. The executable is based on the path specified in the “Executable Path” field that appears when selecting this option. The application needs to be installed on the ARD kiosk’s computer.
ALICE Receptionist does not directly support third-party applications. An executable that is loaded may not function properly within the ARD. The ALICE Receptionist team does not support or guarantee the ongoing functionality of any application within the ARD.-
Executable Path – Insert the file path on the local ARD kiosk computer where the executable is located.
-
-
Image – Displays an image, typically a message, map, information, directions, etc. The image displayed must have its path defined in the “Image File” field that appears when this option is selected.
-
Image Field – Include the image’s file path. The ALICE PC must have access to this file. For the fastest response time, it is recommended that the file be stored locally on the ALICE Kiosk PC running the ARD.
The ideal media dimensions are 1080 x 1097 for landscape systems and 1024 x 1080 for portrait systems.
-
-
Ring Group – Calls a specific group of individuals. The group called can be set using the “Ring Group” field that appears when this option is selected.
-
Ring Group – Use the drop-down menu to include the Ring Group to be called. The Ring Group must be a part of the system’s membership.
Learn more about creating and adding Ring Groups in the ALICE Portal Ring Groups Tab section.
-
-
URL – Displays most websites in the ARD's embedded Chromium browser. The website displayed is defined in the “URL” field that appears when this option is selected.
-
URL – The web address to be opened when this card is selected.
-
Remove Links – Disables links on the website displayed on the ALICE Directory, preventing navigation away from the specified page.
-
Show Keyboard – This enables an on-screen keyboard for the user to populate fields on the web page.
-
-
Video – Opens and plays a video on the ALICE Directory. The video played is specified in the “Video File” field that displays when this option is selected.
-
Video File – Include the video’s file path. The ALICE Kiosk PC must have access to this file. For the fastest response time, it is recommended that the file be stored locally on the ALICE Kiosk PC running the ALICE Directory.
-
Loop Video – Enabling this option causes the video to loop when finished.
-
Fullscreen video – Enabling this option causes the video to be stretched to fill the entire content space.
-
-
Ring Group – Selecting the card will call a Ring Group instead of the individual directly. Which group is called depends on which is selected in the “Ring Group” selection that appears once the option is selected.
-
Ring Group – Use the drop-down to select which Ring Group will be called when this card is selected. Refer to the ALICE Portal Ring Groups Tab section for more details on Ring Groups.
-
-
-
Primary Number/Address – The phone number or SIP extension that will be called when this employee is selected.
-
Secondary Number/Address – The number utilized by the Split and One-Way Video call options. The number included here should be the DID phone number the secondary line will call.
-
Mobile Number – The mobile number that will receive a text message when mobile text message notifications are enabled for the employee.
-
Card State – This field changes how the card's appearance on the ARD, including visibility and positioning.
- Visible – The default option that shows the card on screen with the name displayed on the card.
-
Card Hidden – The card will not display on the ARD.
-
Name Hidden – The card will be displayed, but the name will be hidden. This is typically used for cards that display a logo or graphic.
-
Static – Locks this card to appear on every page of the Directory list.
-
Static and Name Hidden – Applies the "Static” and “Name Hidden” functions onto a single card.
-
Show in AVM? – Toggles whether the employee will appear as a host during visitor check-in.
-
Receive call on check-in? – Toggles whether the employee will be called after a visitor check-ins with them. If the employee's card is set to call a ring group, the ring group will be called instead.
-
Note: This feature is only available to Visitor Management Enterprise + Front Desk subscribers.
-
-
Department – Assigns an Employee to a Department. Select which Department from the drop-down list. To create a new Department, refer to the ALICE Portal Departments Tab section.
-
Position / Title – Assigns the Employee a Position. Select which Position to assign the Employee from the drop-down list. To create a new Position, refer to the ALICE Portal Positions Tab section.
-
Import Employee to – When an Employee listing is created, the Employee will be added to the Membership of all the selected ALICE Receptionist Directories. Check off all the ALICE Receptionist Directories to add the Employee to.
If the Directory does not appear, verify at the top of the ALICE Portal that the correct Location and Company are selected in the drop-down menu.


Editing an Employee
Click the  icon in the last column of the row. A pop-up window will appear where the listing's settings can be edited. Refer to the ALICE Portal Employees Tab section for more information on each field.
Note: Employee listing usernames cannot be changed.
Click Save to finalize the listing.
Adding an Employee to an ALICE Receptionist Directory
When creating or editing an Employee listing, they can be added using the “Import Employee to” option to add them to an Directory’s Membership directly. The Employee listing can also be added from the Directory's Membership screen.
Refer to the ALICE Portal Directories Tab section for more details.
Removing an Employee From an ALICE Receptionist Directory
To remove an Employee listing from a Directory, navigate to the Directory Membership screen and the check mark by the Employee listing.
Refer to the ALICE Portal Directories Tab section for more details.
Deleting an Employee Listing
Click the  icon on the far-right column of the row. A pop-up window will ask for confirmation on deleting the listing from the database.
Note: This action cannot be undone. The listing will be removed from the portal. The related records will be retained.